Campus Cluster Usage Guide
Overview
This article is written for people who are intended to utilize campus cluster at UIUC for computation-heavy work, especially for the Huang group members. I will be using electron ptychographic reconstruction as an example. The article will cover:
I. Introduction to campus cluster
II. Getting started, step-by-step guide
III. Other useful Slurm commands
IV. Common mistakes and additional information
V. My ptycho reconstruction setup
For template scripts, see my github repo https://github.com/chiahao3/ptycho
Last modified: 2022/11/15 by Chia-Hao Lee
I. Introduction to campus cluster
1. Why campus cluster?
Campus cluster provides powerful hardware (CPU, GPU, large memory) so that we could do larger scale of image and diffraction simulations, ptychographic, tomographic, cryo-EM reconstruction, and machine learning-related applications.
2. How do I use campus cluster, and is it free?
You need to either 1. become an investor (by purchasing hardware) or 2. join an existing investor. Engineering college already invested so we can just join them without paying extra, but it’s probably paid by the overhead from all incoming fundings anyway. See this link to a list of current investors.
3. What is the workflow while using campus cluster?
- Login to the campus cluster and you’ll land on the head node
- Get your script, data, code ready on the campus cluster storage
- Submit your job, it will be arranged on the queue schedule by Slurm (a scheduling software) and will be executed on the computing node(s) once the computing resources (nodes) are available
- Collect the computation results/files when the job is done
4. What is the hardware spec of campus cluster?
You may only use the hardware in the partitions that you’re granted access to. As an engineering college student, the primary queue is eng-research. Therefore, we can only access the following partitions:
- eng-research
- 72 compute nodes providing 1,764 CPU cores
- 9 dual-socket Intel Xeon E5-2680v4 Broadwell CPU nodes w/ 256GB RAM (224 CPU total cores) w/EDR InfiniBand interconnects
- 63 dual-socket Intel Xeon E5-2690v3 Haswell CPU nodes w/256GB RAM (24 cores per node, 1,824 CPU total cores) w/EDR InfiniBand interconnects
- 72 compute nodes providing 1,764 CPU cores
- eng-research-gpu
- 7 Compute nodes providing 280 CPU cores and 14 NVIDIA GPUs:
- 7 dual-socket Intel Xeon Gold 6148 Skylake CPU nodes w/ 192GB RAM & 2 NVIDIA V100 16GB GPUs (280 total CPU cores) w/HDR InfiniBand interconnects
- 7 Compute nodes providing 280 CPU cores and 14 NVIDIA GPUs:
- secondary
- 23 nodes with GPU and 3 of them have high-end V100 GPU cards
- test
- short turnaround time but has no GPU capability.
- mrsec (optional, you need to additional request it and it contains only CPU nodes so not very useful for ptycho reconstrucitons)
Here’s a list of common nodes with high-end GPUs that we have access to:

To see a full list of every accessible nodes with GPUs and their performance, see our Google Spreadsheet.
5. Where can I learn more about the campus cluster?
There are a huge amount of wonderful documents and manuals regarding how to use Slurm for cluster computing. I’ll just list a few here.
- https://vision.cs.uiuc.edu/campuscluster/TheCampusCluster_sp2013.pdf
- https://campuscluster.illinois.edu/resources/faq/
- https://campuscluster.illinois.edu/resources/docs/start/
- https://campuscluster.illinois.edu/resources/docs/user-guide/
- https://campuscluster.illinois.edu/running-serial-jobs-efficiently-on-the-campus-cluster/
- https://slurm.schedmd.com/documentation.html
- https://hpc.nmsu.edu/discovery/slurm/serial-parallel-jobs/#:~:text=The srun command informs Slurm,of steps in the file
II. Getting started, step-by-step guide
1. Get access to the campus cluster
- Request access through this link, choose eng-research for primary queue if you’re affiliated with engineering college. The application usually get approved in 2 business days. You would be able to log in with your NetID after approval.
2. Log in to the campus cluster
-
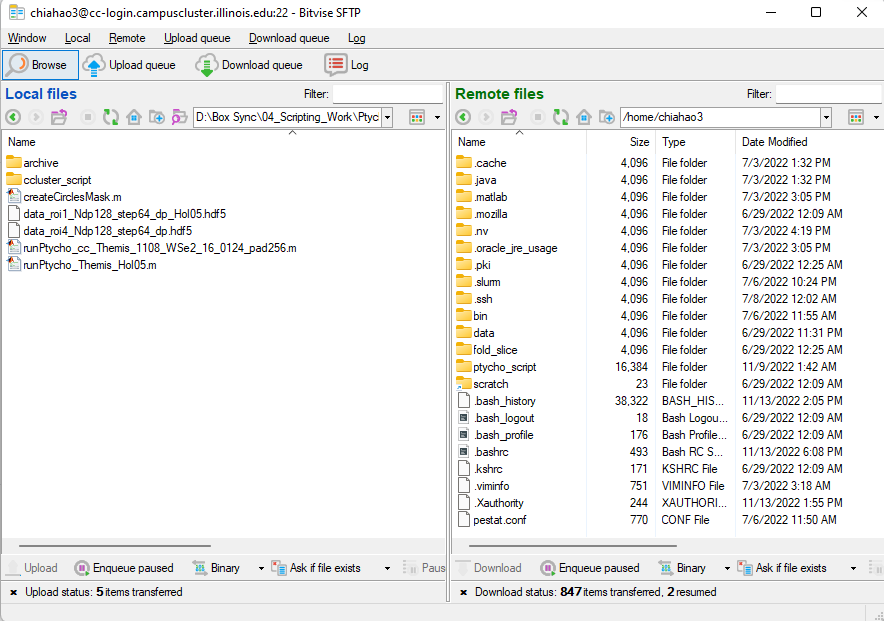
Install a SSH client to connect to the campus cluster. Recommend Bitvise for Windows, it has GUI for SFTP file transfer which is very beginner friendly.
-
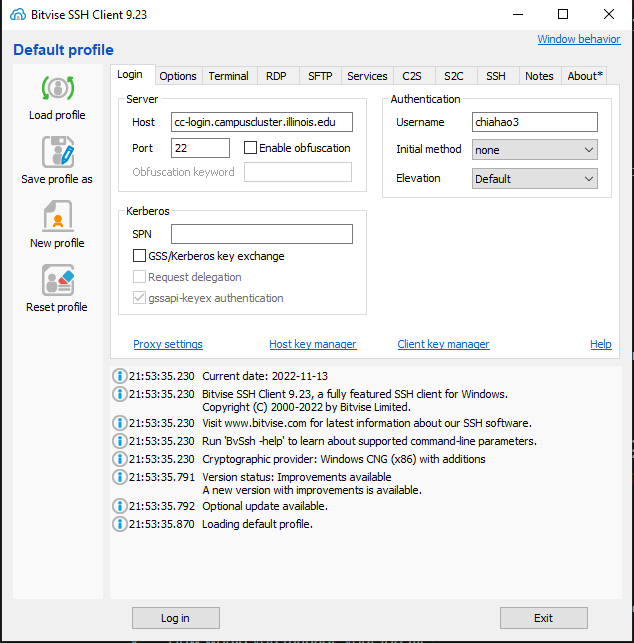
Open the SSH client, login with:
Host: cc-login.campuscluster.illinois.edu, port:22
username: NetID
It will prompt you with the password, use your AD password.
-
Open a terminal (command line interface, CLI) or SFTP window (file transfer)
3. Prepare your data, scripts, and programs (packages)
- Plan your overall workflow for data, output file, source code, packages, script, job file
- Computing with Matlab, C++, Python, or compiled executables?
- Do you need to input data, feed in parameters, or both?
- If you need to provide input data, where do you store them?
- Where do you want to save your output file? With the input data, or at a separate folder?
- How would you manage your job files?
- Plan and Practice these on your local machine first!
- Understand the difference between campus cluster file system (/home, /scratch, /project)
- /home: 5GB soft limit, 7GB hard limit, 7 days grace period, no purging (deleting)
- /scratch: 5TB soft limit, 10TB hard limit, purge files older than 30 days
- /project: Depends on the investment. Need to ask the Technical Representatives to get access to their specific folder. For engineering students, please contact the at techrep@engr.illinois.edu in order to be granted access to engineering storage.
- Upload your data, scripts, and packages to the corresponding locations
- Use a GUI would probably be much faster than cp, mv commands if you’re not familiar with Bash in Linux.
- Regarding the questions in 3.a, my setup is as followed:
- Computing with Matlab package (fold_slice from Yi Jiang for electron ptychography). I save this under my home directory as
/home/NetID/fold_slice - We need both input data and input parameters, since input data are large 4D-STEM dataset, it’s better to temporarily store them under
/scratch/users/NetID/ - Input parameters are related to each job submission, they’re much smaller in size so I put them with my job scripts under
/home/ptycho_script/- Inside the
/ptycho_script/folder, create job folders for management likejob_20221109_Themis_1108_WSe2_16_EMPAD/ - Within each job folder, I put all the relavent job scripts, log files, MATLAB scripts.
- Inside the
- The PtychoShelves default reconstruction output directory is stored within the input project folder, therefore, also in
/scratch/users/NetID/
- Computing with Matlab package (fold_slice from Yi Jiang for electron ptychography). I save this under my home directory as
4. Submit your job to the campus cluster
-
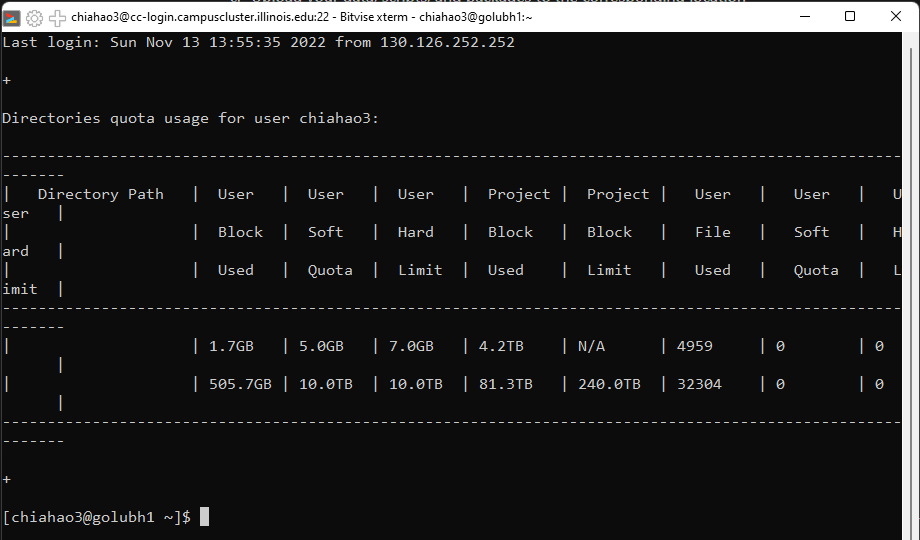
Log in to campus cluster with terminal console (command line interface, CLI), you’ll land at the head node that looks like this:
- Change directory to where your job script is using
$ cd <directory>For example,$ cd ptycho_script/job_20221109_Themis_1108_WSe2_16_EMPAD/ - Submit your sbacth script file using
$ sbatch <script_name>For example,$ sbatch eth_2task_V100_runPtycho_01.sbatch- You may specify the node and dependency during submission
- Once you submit the job, you should get a message in command line with
Like “Submitted batch job 7238715”
5. Monitor your job status
- Use
squeue --format="%.20i %.13P %.15j %.8u %.8T %.10M %.9l %.6D %R %S" --meto minitor the status of your submitted job, it could be either “Pending” or “Running”- For pending, it’ll show an expected START_TIME which is assigned by the scheduling algorithm at the moment. The expected START_TIME might change if users change their job run time while executing. Usually, your job will get executed earlier than the initially assigned time because people cancel their jobs (or their jobs failed).
- If your job is already running, you may check the output txt log files using SFTP
- Use
sacct --format=jobid,jobname,partition,nodelist,ncpus,start,end,elapsed,state,MaxRSS,ReqMem -j <JobID>to minotor the allocated resources of the job- Information including number of CPUs, start/end time, requested and maximum used memory, and see if your tasks are ran concurrently (with the same start time)

- Use
scancel <JobID>to cancel your job if needed- Or
scancel -u <UserName>to cancel all your jobs
- Or
To summarize, only 4 main commands that you need to know:
sbatchto submit your jobsqueueto check on your submitted jobsacctto check on your running and completed jobscancelto cancel your job
III. Other useful Slurm commands
-
To submit to a specific node or with a dependency (to avoid the parallel computing toolbox error)
  sbatch -w <HostName> <ScriptName>
  # Example: sbatch -w ccc0077
sbatch --dependency=afterany:<JobID> <ScriptName> # Presumably the license will free up once the previous job finish -
To remove a queued job or delete a running job identified by JobID:
scancel <JobID> -
To show the node information
scontrol show node=<HostName> -
To display details of a specific active (running/pending) job identified by JobID:
scontrol show job <JobID> -
To show the default Slurm configuration of campus cluster
scontrol show configuration -
To change the time limit of a job
scontrol update jobid=<JobID> TimeLimit=<NewTimeLimit> # Example: scontrol update jobid=5868183 TimeLimit=1-10:00:00 -
To write the submitted script of a submitted job
scontrol write batch_script <JobID> [OptionalFilename] -
To view the submitted jobs sorted by priory within partition (eng-research-gpu)
squeue -p <Partition> -S -P -o "%.12i %.16P %.8j %.8u %.8T %.10M %.9l %.6D %R %S %e" -
To view job and node status easier using .bashrc and pestat (technically these are Bash tips, not Slurm)
  # Add the following to .bashrc under $home to save some work, note that you need to download "pestat" first to use this alias
  alias squeue='squeue --format="%.20i %.13P %.15j %.8u %.8T %.10M %.9l %.6D %R %S"'
  alias pestatGPU='pestat -G -n ccc0078,ccc0079,ccc0080,ccc0081,ccc0082,ccc0083,ccc0084,golub121,golub122,golub123,golub124,golub125,golub126,golub127,golub128,golub305,golub346,golub347,golub348,golub349,golub378,golub379,golub380,ccc0037,ccc0060,ccc0076,ccc0077,ccc0215,ccc0286,ccc0287'

  # alias is used to generate shortcuts to these user-defined command with specific format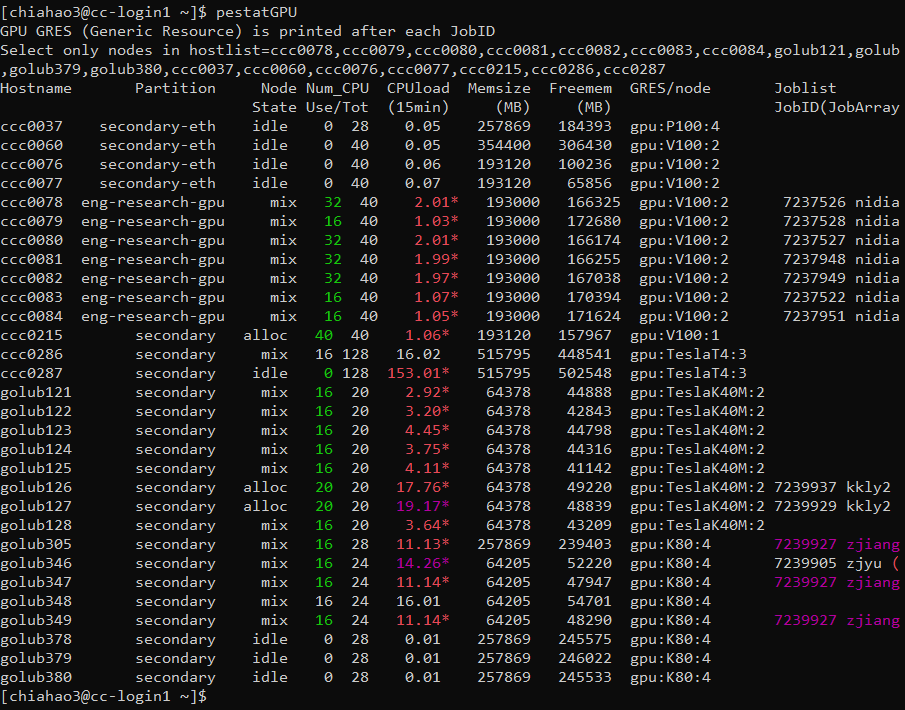
Screeshot of
pestatGPU. Note that “Freemem” has nothing to do with the scheduling or computation. The allocable/available memory is roughy 95% of the mounted Memsize. See this link for more information about allocable memory and free memory. -
To view the partitions(queues) that users have the ability to submit batch jobs to
sinfo -s -o "%.14R %.12l %.12L %.5D" -
To view the accounting information for all jobs of a user:
sacct -u <UserName> --format=jobid,jobname,partition,ncpus,start,end,elapsed,state -
To start an interactive session
  **srun --partition=<Partition> --time=00:30:00 --gres=gpu:V100:2 --pty /bin/bash**
  exit #type this to leave the computing node
IV. Common mistakes and additioanl information
Common mistakes
- Wrong path, file doesn’t exist, missing “/” while connecting directories
- Wrong file version
- The node requested has no resources that you need (e.g. GPU) or not enough (memory)
- Wrong linebreak (Windows vs. Unix)
- The line break format is different in Windows and Linux, avoid Windows Notepad, use WordPad or Notepad++ if possible
- Windows/Linux compatibility
- Linux file system is case SENSITIVE
- Windows uses \ (backslash) for file directories, while Linux use / (forward slash)
- Maximum number of users for Distrib_Computing_Toolbox reached (Limited Matlab license)
- You may try
while true; do <your_command>; sleep <interval_in_seconds>; doneto keep submitting your job at certain intervals or just setup a dependency.
- You may try
Additional information
- The hierachy of the campus cluster is:
- Cluster has a couple partitions (queues) like eng-research and eng-research-gpu
- Each partition has a couple computing nodes (computing unit for resource requesting) like ccc0076
- Each computing node has tens of CPUs, potentially a few GPUs, tons of memory, and interconnections to a larger storage
- Each CPU has tens of independent processors (like 20 cores)
- Each core is a physical unit that can process a single task/process at a time
- “Threading” is the technique to virtually put more tasks within each physical core
- Each node can host only 1 user, so node is also called Host. This is the basic computation unit for user. Besides, node should be considered as a physical entity (like a computer on a shelf)
- User can request the needed resource so that a suitable node can be assigned.
- If you request 1 CPU and 1 GPU but the node has 4 CPU and 4 GPU. You will not be able to access / use the rest 3 CPU and 3 GPU.
- The scheduling only grant you the access to the specified resource on the node, not the entire node.
- The usage fee is usually calculated by CPU/hr so if you’re only using 1 CPU and the rest of 19 CPUs are idling, you will not be charge for the entire node.
The difference of jobs, steps, and tasks
https://stackoverflow.com/questions/46506784/how-do-the-terms-job-task-and-step-relate-to-each-other
A job consists in one or more steps, each consisting in one or more tasks each using one or more CPU.
Job is more like a feast that contain multiple dishes, and each dish take need multiple steps, each step may have a few tasks to process the ingredient.
Jobs can be both big and small, it can be a small job that run on a single node, consists of 1 step, 1 task on a core of 1 CPU; or it can be a big job that has multiple steps on multiple nodes, each node using multiple CPU cores to process multiple tasks.
Jobs are typically created with the
sbatchcommand, steps are created with thesruncommand, tasks are requested, at the job level with--ntasksor--ntasks-per-node, or at the step level with--ntasks. CPUs are requested per task with--cpus-per-task. Note that jobs submitted withsbatchhave one implicit step; the Bash script itself.
V. My ptycho reconstruction setup
1. Workflow
- Do experiments on the microscope, and keep exp parameters with the project name
- Like
0124_18mrad_cl185mm_20.5Mx_df0nm_10pA_step128/ - To keep things tidy, I save all my EMPAD project folders under my own
chiahao3/folder. All the fresh EMPAD project folders are moved to exp subfolders like20221108_TEM_ThemisZ_80kV_WSe2_16_EMPAD/at the end of the session. Therefore, there’s no need to create a bunch of project folders under the mainempad_projects/folder.
- Like
- Transfer the EMPAD data from microscope computer to the support PC
- Upload the EMPAD data from support PC to cloud Box storage using Globus
- No need to wait for file transfer in person, everything can be done remotely!
- Contact CQ to get access to the Globus endpoints on Themis/Talos support PC
- Although we can upload the files directly from support PC to campus cluster using Globus, I still prefer checking the data on my local workstation before uploading to campus cluster
- Box Sync will automatically download the files to my local workstation for further inspection/processing
- Log the experiment parameters into an EMPAD data summary Google spreadsheet
- Determine process priorities and reconstruction parameters
- Create corresponding script files
- Matlab script
runPtycho_cc.m - Slurm job script
eth_2task_V100_runPtycho_01.sbatch
- Matlab script
- Upload the job script files to
home/ptycho_script/and exp data toscratch/ - Log into head node, change the directory into the
home/ptycho_script/<job_folder>, this is where you store the Slurm job .sbatch scripts - Submit your job scripts using
sbatchcommand - Check on the job progress using
squeue,sacct, and the txt log files/images with SFTP- The txt log files provide a convenient way of checking the reconstruction status, including any license issue, memory error, reconstruction error, or expected end time.
- Typically I refresh the SFTP view to see if the txt file size gets larger
- You may check the reconstructed images directly through SFTP as well
- Download the reconstruction results to local workstation, which will be automatically sync to the cloud Box storage for permanent storage. (Don’t forget that files in
scratch/get purged in 30 days) - Keep notes about the reconstruction results in the EMPAD data summary Google spreadsheet and presumably make a summary PPT slide
2. Folder structure
- Local workstation (Use Box Sync to sync with unlimited cloud Box storage)
D:\Box Sync\04_Scripting_Work\Ptychography\ptycho_script\ccluster_script\- Create separate job folders to store the scripts of ptycho reconstructions and the log files
- Campus cluster
-
/home/chiahao3/(This directory will not get purged but is limited to 7GB)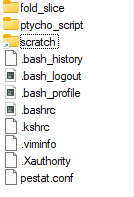
- Save the
fold_slicepackage here. The path to the package needs to be specified in therunPtycho_cc.mMatlab script -
Create
ptycho_script/folder to keep all the job folders uploaded from local workstation
- Save the
-
/scratch/users/chiahao3(Files older than 30days in this directory will be purged, 10TB hard limit)
-
Save the experiment folder here. Each folder contains tens of EMPAD project folders. The EMPAD project folder has the raw data, and the reconstruction output will be saved to here as well.

-
Use different
scan_numberto create different result folders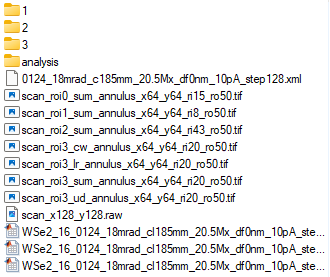
-
-
-
3. Code descriptions
- Matlab script
runPtycho_cc.m- I combine the
prepare_data.m(generate probes) and theptycho_electron.minto a singlerunPtycho_cc.mwith some rearrangement to put all common parameters at the front of the script. - Also add a few features including jobID, dScan (downsampling factor), and output param files (in case we keep reusing the script file by changing parameters)
- There’re just too many parameters (exp and recon) for us to package the script into a function and pass a param file, so I decided to create an all-in-one script file with parameters inside to keep track of every major reconstruction trials.
- I combine the
- Slurm job script
eth_2task_V100_runPtycho_01.sbatch- Although each job script can contain tons of tasks with multiple nodes, I prefer using 1 node per job to make things clearer. Also cancelling a job would be easier if it’s running on a single node.
- Note that we choose the node with 2 GPU cards, so each sbatch script has 2
sruncommands to run 2 independent ptycho reconstructions concurrently. 1 reconstruction per GPU. - In the script header, the partition (queue), number of CPU, GPU, memory, and tasks are explicitly specified.
- Additional scripts that might be handy
- Grab the reconstructed object/probe images by walking through every EMPAD scan folders
- Read the EMPAD scan folder names and generate corresponding Matlab scripts
- Read the EMPAD scan folder names and generate corresponding
4. Template scripts
See my github repo https://github.com/chiahao3/ptycho
- Matlab script
runPtycho_cc.m- Slurm job script
eng_2task_V100_runPtycho_01.sbatchptycho_recon_image_stack_generator.ipynb

Leave a comment